In this lab you will learn how to configure the backbone area (Area 0) of Open Shortest Path First (OSPF) to build the backbone foundation of an OSPF network.
Real World Application & Core Knowledge
If you completed the previous lab then theirs a high possibility that R1 may not be the designated router and this will definitely cause a routing update problem.First off when you configured OSPF on R1 first, it extrapolated the loopback interface IP address as its router-id, which in this case would be 10.55.10.1. When enabling OSPF on R2, it would have got the RID of 10.55.20.1. By default both routers interface priority would have been 1 so the DR/BDR election process tie breaker would have been the router ID, and in this case R2 would have became the Designated Router as it has a higher router ID number and R1 would have became the DBR.
Take a step back and look at the big picture for a minute and lets say R5 needs to send an Update to the DR, in which case it will look up the frame relay map and send the multicast update to 224.0.0.5 out dlci 521. In order to get to the DR (R2) the packet must traverse R1. Now if you think back and remember in Lab 9-1, you should recall that OSPF sends multicast traffic using a TTL of 1, so with this in mind soon as the packet reaches R1, it would not be forwarded to the DR because its TTL would be decremented to 0 and dropped. With this being a problem, routers on the hub and spoke network would not function properly as updates would not properly reach the DR.
To fix this problem you need to configure the spoke routers to NEVER become the DR/BDR. This is done by setting the interface priority to 0. The interface priority is an integer between 0-255 and is configured using the ip ospf priority # command in interface configuration mode.
You could also fix this problem by raising R1′s frame-relay hub and spoke interface priority to 10 for example but this would not prevent R2, R4 and R5 from becoming a BDR, in which case would become the DR in the event of a DR failure thus putting you back at square one.
You can verify which neighbors are the DR/BDR/DROTHER by using the show ip ospf neighbor command in privileged mode.
Familiarize yourself with the following new command(s);
ip ospf priority # – Configures an OSPF priority on a per interface basis used to manipulate the DR/BDR election process.
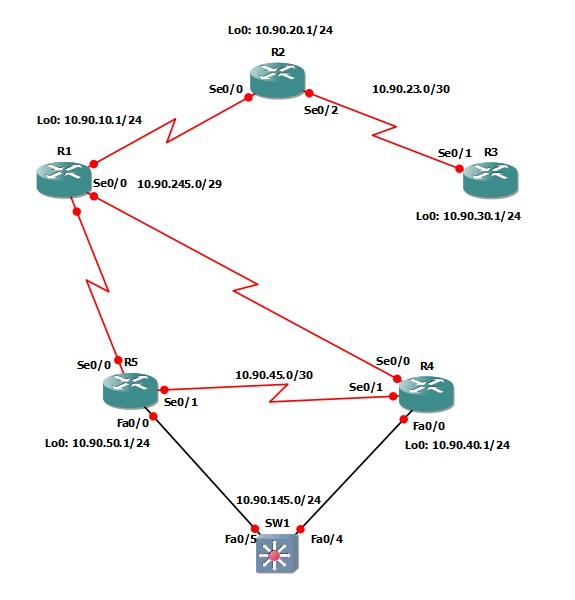
The following logical topology shown below is used in labs found through out Section 9 – Configuring OSPF;
Lab Prerequisites
• If you completed lab 9-1 you can start where you’ve left off or you can load the Free CCNA Workbook GNS3 topology; start and establish a console session with R1, R2, R3, R4, R5 and SW1 then load their initial configurations included below by copying the config from the textbox and pasting it into the routers console.
Initial Configurations
Lab Objectives
• Configure the Serial interfaces on the Frame relay spoke routers with an OSPF priority to ensure they NEVER become the DR/BDR.
• Clear the OSPF routing process on R1 so that all neighbor relationships are rebuilt then verify that R1 is elected the DR on R2.
Lab Instruction
Objective 1. – Configure the Serial interfaces on the Frame relay spoke routers with an OSPF priority to ensure they NEVER become the DR/BDR.
R2>enable |
R4>enable |
R5>enable
R5#configure terminal
Enter configuration commands, one per line.  End with CNTL/Z.

Objective 2. – Clear the OSPF routing process on R1 so that all
neighbor relationships are rebuilt then verify that R1 is elected the DR
on R2.
R1#clear ip ospf 1 proc |
R5(config)#interface Serial1/0
R5(config-if)#ip ospf priority 0
R5(config-if)#end
R5#
1 komentar:
nice gan... :a8
:a9
Posting Komentar
Silahkan isi kesan hati anda di sini !!!