Real World Application & Core Knowledge
In lab 9-1 when you configured OSPF initially you had to change the frame relay hub and spoke network type to broadcast to ensure the neighbor relationships formed. However the default network type for OSPF on a serial interface with frame relay encapsulation is non-broadcast. With this in mind you must configure static neighbors to ensure OSPF can form a neighbor relationship, this is due to frame relay trading multicast as pseudo-broadcast and if a frame relay PVC (Permanent Virtual Circuit) is not broadcast capable then multicast would not traverse the PVC.In this lab you will revert the routers serial interfaces in the hub-and-spoke topology back to its default, non-broadcast and configure a static neighbor statement on R1. The static neighbor statement only needs to be configured on the hub however its best to configure it on both hub and spokes to ensure initialization of neighbor negotiation.
You can manually specify the network type as non-broadcast on the interface of you can negate the current OSPF network type on the interfaces thus reverting it back to its default; either way will suffice for this lab.
Familiarize yourself with the following new command(s);
no ip ospf network – Executed in interface configuration mode to revert the OSPF network type back to its default for that specified interface.
ip ospf network non-broadcast – Executed in interface configuration mode to configure the specified interface opsf network type to non-broadcast; this mode requires static neighbor statements and will form a DR/BDR relationship.
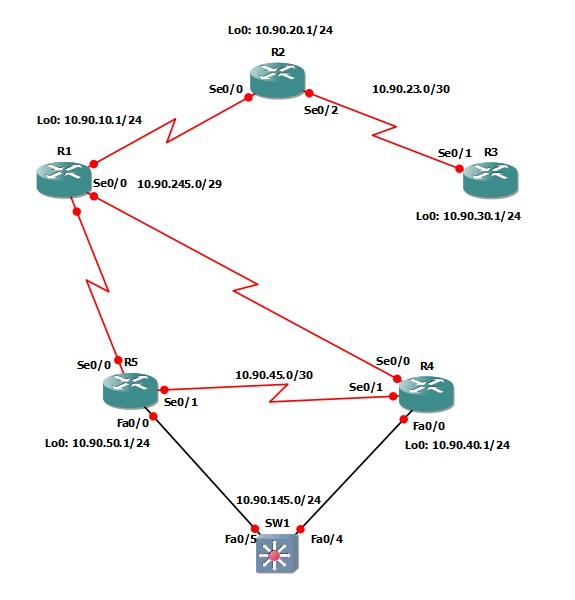
The following logical topology shown below is used in labs found through out Section 9 – Configuring OSPF;
Lab Prerequisites
• If you completed lab 9-3 you can start where you’ve left off or you can load the Free CCNA Workbook GNS3 topology; start and establish a console session with R1, R2, R3, R4, R5 and SW1 then load their initial configurations included below by copying the config from the textbox and pasting it into the routers console.
Initial Configurations
Lab Objectives
• Revert the OSPF interface type back its default on R1, R2, R4 and R5′s frame relay hub and spoke interfaces.
• Configure static neighbor statements on R1 pointing to R2, R4 and R5.
• Verify that the neighbor relationships form using the show ip ospf neighbor command.
Lab Instruction
Objective 1. – Revert the OSPF interface type back its default on R1, R2, R4 and R5′s frame relay hub and spoke interfaces.
R1>enable |
R2>enable |
R4>enable |
R5>enable |
R1#configure terminal |
Objective 3. – Verify that the neighbor relationships form using the show ip ospf neighbor command.
R1#show ip ospf neighbor

Neighbor ID     Pri   State           Dead Time   Address         Interface
10.55.20.1        0   FULL/DROTHER    00:01:51    10.1.245.2      Serial1/0
10.55.40.1        0   FULL/DROTHER    00:01:35    10.1.245.4      Serial1/0
10.55.50.1        0   FULL/DROTHER    00:01:45    10.1.245.5      Serial1/0
R1#

0 komentar:
Posting Komentar
Silahkan isi kesan hati anda di sini !!!